Showing posts with label Tomatoes. Show all posts

Sunday, August 12, 2012

San Marzano Tomatoes

San Marzano tomatoes were my biggest discovery and surprise in my garden this year. It is a paste tomato that is considered in foodie circles as the best variety grown for making sauce or paste and it has a fanatical following judging by articles and blogs on the Net. Jason L Morrow even started blog dedicated to this gem called, what else, San Marzano Tomato Blog. What an incredible article! It is worth reading to the end. It even has a recipes for sauces etc.
Anyway, I am hooked and it is one variety that I will grow every year from now on. I have planted only 2 seedlings that I started indoors from seeds bought from Thompson  & Morgan seed company. Problem is/was that packet had 300 seeds! Three Hundred Seeds!!! That’s for a farm and not a hobby gardener like me. It is even too many to give away. Until now I have harvested about 18Lb from both plants and I still have at least 6 weeks of growing season left. My freezer will be full of bags with sauces!

Here is a picture story of San Marzano tomatoes from harvest to freezer.

After quartering  7 pounds of  tomatoes for food processor there was hardly any juice on cutting board, that’s how dry they are, no need for hours of reduction on the stove.

This is straight from Cuisinart, check how thick the sauce is already.

The sauce after 45 minutes of simmer. No rapid boil is needed since tomatoes do not have much water.

After the simmer I used food mill fitted with smallest holes plate to remove skin and seeds.

All done in ONE hour!  I freeze the sauce in large freezer bags and just break apart small piece I need for whatever I cook.

Monday, October 10, 2011

Heirloom Tomatoes


Few weeks ago I ate my very first heirloom tomato and I was hooked immediately on the taste of this light yellow tomato. It was given to us by our neighbor who is retired farmer. Apparently, his friends found it among hundreds of plants they grow for making tomato juice and since it didn’t look red they threw it out. Knowing that we will try anything new food-wise he brought them to us. I do not understand why I waited so long to taste these tomatoes since I do shop at local Amish farms and at our local farmers market and they were always available in season. Looks like my plans for next year veggie garden are changing already since I will definitely grow some heirloom tomatoes.

Last Thanksgiving Sunday we went for a ride in the country and we came across a roadside stand that was selling heirloom tomatoes of all sizes, colors and shapes. Since all of them are open pollinated varieties I will collect the seeds from tomatoes that both of us really like.

This morning we did a little tasting and they are really good! They were nowhere as sweet as some regular red hybrids, but instead there was nice balance between sweet and tart. They will be great in salads and relishes, I think. So far I picked 3 (and counting) that I will try to grow. Over the winter I will try to identify the varieties that I have collected seeds from; not an easy task. Maybe I will email pictures to some seed houses and ask if they can help. It is not all that important to know the name but if somebody will taste my tomatoes, likes them and asks for the name it would be nice to know the answer.

Of course, if you know any of these tomatoes, please, leave a comment.

Here is link to interesting description of “Heirloom Tomato”.

Friday, September 30, 2011

Oven Baked Chicken Thighs and Veggies


Yes, another chicken recipe, but this time using most flavorful part of chicken, the thighs. They take much, much longer to cook then a breast but they are also so much more flavorful.

With the exception of mushrooms and chicken, of course J, all other ingredients that formed the sauce were from my garden: onion, eggplant, red and green peppers, tomatoes and garlic. Prep time is reasonable 20 minutes or so of chopping and slicing. As is the case with all of my recipes amounts given are for 2 people plus good leftovers for next day lunch. I served it with orzo (rice shaped dry pasta) but it can be served with any other dry or even fresh pasta, boiled potatoes, mashed potatoes or rice.

Ingredients

4 chicken thighs (bone in and skin on)
1 Tbs. olive oil
1 Tbs. butter
1/2 medium onion
1 Oriental eggplant or 1/2 regular eggplant
1 red pepper
1 green pepper
2 Roma tomatoes
1 cup sliced cremini or white mushrooms
3 cloves garlic, smashed
2 tsp. olive oil
2 tsp. butter
Salt and pepper
1 tsp. dried basil or 2 tsp. fresh chopped basil

 Preheat oven to 350 °F and place rack in middle.
Generously sprinkle salt and pepper on all sides of chicken thighs and set aside.
Slice or chop onions, eggplant, tomatoes and peppers.
In oven-proof skillet (avoid non-stick pans) heat oil and add butter. When the foam subsides place thighs skin side down and cook until skin starts to brown little bit. Turn the chicken thighs over and cook another 3 minutes. Remove to plate and cover with foil.

In the same skillet, drop in onions and cook until they start to caramelize, scraping the bottom of the pan to loosen any browned bits.
Add eggplant, peppers, tomatoes, garlic and mushrooms and stir to mix all vegetables.
Return the chicken thighs with accumulated juices back into skillet, cover and place in the oven. Check every 15 minutes if there is any juice left. If it looks too dry add white wine or chicken stock.

Meanwhile, cook your side (pasta, rice or potatoes).

After 30 minutes remove the cover from skillet and raise the oven temperature to 400 °F. Add the basil and cook for 10 more minutes or until the chicken skin is gold and crisp.

Serve immediately.

Friday, August 26, 2011

Ratatouille and Pork Sausage.


I had some homemade pork sausage on hand but not enough for meal for 2. I could have used it in a pasta sauce but since I have so many Oriental eggplants I had to incorporate them somehow. Since it is one of ingredients in French Ratatouille I had decided to improvise something new (I have never seen a recipe similar to what I came up with).
Again, there is not much of a detailed recipe.

Preheat oven to 350 °F.

Butter ovenproof dish and spread raw pork sausage, store bought is fine, into 1/2” layer.

Next, lay down row of eggplant, than tomatoes, zucchini, followed by white onions, more tomatoes and more eggplant, all sliced. This is basically layer of Ratatouille. The veggies were seasoned with sea salt and about 2 tsp. of “Herbes de Provence”. (To mix your own “Herbes de Provence” I have included recipe at the end of this post.)


Since it didn’t look like there is enough substance I peeled and sliced Yukon potato and covered vegetables with overlapping potato slices. I lightly salted potatoes and sprinkled olive oil on top. In order for vegetables and meat to heat evenly I covered the top with parchment paper and then aluminum foil. (The paper prevents salt from interacting with aluminum and burn holes in the foil.) Place the dish on baking sheet and bake on middle oven rack for 45 minutes

Right from beginning I was going to top the veggies with slices of Provolone cheese so after 45 minutes raise the temperature to 450 °F, remove dish from oven, remove the foil and paper and cover potato slices with layer of cheese. Put back in oven and bake another 15 minutes or till cheese starts to bubble.


To serve, remove from oven and let sit for 5 minutes. Cut across the rows of vegetables with sharp knife into 2 portions and serve on preheated plates with slices of crusty French baguette.
This is a definite “will-make-again” meal.
Herbes de Provence
Ingredients
2 tablespoons dried savory
2 tablespoons dried rosemary
2 tablespoons dried thyme
2 tablespoons dried oregano
2 tablespoons dried basil
2 tablespoons dried marjoram
2 tablespoons dried fennel seed
Directions
In a small mixing bowl, combine all the ingredients together. Store in an air-tight container.

Monday, August 22, 2011

Tomato Sauce


I have to admit that until two weeks ago I have never made or tasted pure tomato sauce. I have made hundreds of tomato sauces but they always had at least celery, peppers, onions and garlic in them. This was my very first time that I have made tomato sauce from my very own tomatoes with absolutely nothing else: no salt, sugar, onions, peppers, garlic or any other vegetables. Just tomatoes, slowly simmered for 4 hours (in this case) and then run through the food mill with the finest plate (1/16” holes). What a revelation it was! Mind you, I did make tons of sauces before using store bought tomatoes plus other veggies but since I have never grown paste tomatoes like Roma I had no opportunity to make basic sauce of my own. Now, I am hooked. Right after I have tasted the sauce I started Googling for San Marzano Lungo tomato seeds that have the reputation as the best paste tomato. Yup, I bought some and now my plans for veggie garden is going through some changes, at least in my mind, that is. My plan for next year was for only 3 tomato plants: one of each “Sweet Baby Girl” (cherry), “Magic Mountain (size and shape of large strawberry) and “Margherita” (Roma). Since San Marzano is meatier and dryer than Margherita I have decided to go with 4 Marzano instead and the salad tomatoes stay the same, 1 of each.
There is not recipe here as far as I can see.
Cut tomatoes in half and then half again, put in pot, cover, and start the simmer. Stir tomatoes every so often to help them release juice but keep cooking it covered. After 3 hours I removed the cover (I never used pressure cooker locked cover) and let reduce to fairly thick consistency, stirring more frequently. Never let it burn!
When there is very little liquid visible at surface it is time to run it through food mill. I don’t know about any other substitute for food mill besides China Cap strainer (Chinoise). (Now we are talking hard labor here! I used Chinoise when I went to George Brown College’s culinary arts courses back in 1970’s and we had to make all sauces by hand, no food mills and no food processors, just large Chinoise. It is not fun!)


Food mill removes the seeds and tomato skin.

I started with 4 quarts (4L) of tomatoes that gave me 4 cups (1L) of thick sauce.

Since it was 30 °C outside I have decided to make the sauce on my BBQ side burner so I won’t heat up the house. Unfortunately, the BBQ burner doesn’t have too much of a heat control plus if I run it low the wind can blow off the flame. Compromises. Also, towards the end of making the sauce, when the sauce thickens, it is very easy to burn. Because it is much more likely to burn in thin bottom pot I have decided to use my pressure cooker pot because it has very thick bottom. It all worked like a charm.

When done, you have a great basic tomato sauce to be used for many other sauces.
My first sauce was simple spaghettini sauce where I sautéed onions, eggplants, celery, red pepper, garlic (lot of it), hot pepper flakes and oregano for 15 minutes, added the tomato sauce and simmered for 30 minutes on low. Done, no straining or mashing, I like some texture in this sauce.
It looks like I might buy some Roma tomatoes at our farmer’s market to make some more sauce, it is that good!

Sunday, August 14, 2011

Tomato and Green Bean Soup

With Parmigiano Regiano.

I have big load of tomatoes and beans, chicken stock in my pantry and few pounds of real Parmesan cheese. When the hunger pang struck I knew what will chase them away! With chicken stock ready this soup takes just minutes to prepare but I wanted to dress it up a bit, so, out comes my cheese grater. It smelled and looked so great and kind of Summery. When the bowl was almost empty I noticed that now melted Parmesan was not only stuck to my spoon but on the bottom of the bowl as well and it was quite a job to clean the spoon (I use ceramic Chinese spoon only) and the bowl. I do love the taste of hot tomatoes, beans and Parmigiano but next time I will grate it on a baguette toast instead. This way no cheese will end up in the sink.

There isn’t much of a recipe, really: Put stock, chopped beans and tomatoes in sauce pan and boil till beans are soft to your liking and serve J.

Wednesday, July 27, 2011

Veggie Garden Update July 26, 2011

Cucumbers
This is my first year growing my own cucumbers and to say that I am surprised how fast they grow from flower to mature fruit is understatement. Because of space restrictions in our garden I have decided to grow them (3 plants) in large container on a trellis.  I also grow peppers (2 kinds), eggplants and tomatoes in containers and all are doing very well. Cukes, however, are huge surprise. I knew that my tomatoes will be super-productive but I didn’t expect cucumbers to be the same. City slicker’s ignorance, I guess J.
Here are pictures taken of same cuke taken over span of 4 days. It doubled in volume every day. Another plant that will be grown next year.


And, of course, with so many cucumbers harvested daily I had to start pickling them. After wading through dozens of recipes on Internet I have decided to use Ferdzy’s recipe for “Dill Pickles by the Jar”  published on her blog Seasonal Ontario Food. Now I have to wait 6 weeks to taste the results. What was interesting how fast the cucumber skin turned khaki green from bright green once I poured hot pickling brine in the jars.


Eggplants
The eggplant seeds I bought were for eggplant Gretel (there is also Hansel J) that is white and elongated. Even though I did pick few I haven’t cooked them yet. I did taste them raw and there are no seeds to speak of and not a trace of bitterness, exactly what I am looking for in eggplants.

I did have one nasty surprise, though: Green part at top of fruit has thorns like cactus but almost invisible and when I touched it, it was almost like an electric shock. Next time I harvest with leather gloves. I’ll cook some with garlic and olive oil and use it as one of the toppings for grilled pizza I will make tonight.

Nasty thorns.

Chinese Yard Long Beans
Yup, they are almost a yard long now and growing like crazy. What a great bean this is! The beans are about the size of pencil and no string, no tough parts, just a nice sweet bean that I eat raw when I pick them.  They are best when briefly stir fried with ginger, garlic and chilies. Also, they are very productive and I will harvest right to the first frost. I did last year


Tomatoes
Margherita, which is a paste San Marzano type tomato is finely getting mature and red and I will pick first batch tomorrow. When I bought the seeds I didn’t realize that this hybrid is determinate, meaning that all tomatoes mature at same time. However, as you can see on picture some are ready to harvest and others are completely green. What gives? Is there something between determinate and indeterminate tomatoes? I must have missed something. Oh, well, I’ll be freezing them, I guess and make sauce later as needed.

Mountain Magic tomatoes are doing just fine.
.Peppers
I have three kinds of peppers this year: Green to Red, Sweet Pimento and Red Cubana type peppers whose seeds I collected from Mexican peppers sold in big box store. The flesh was so red and thick that I just had to have the seeds. I grew them last year and they were very good. Not as sweet as original but still very good. Conditions for growing peppers in Mexico and Ontario, Canada are a wee bit different, I think J.
The Green-to-Red were first peppers I harvested about  3 weeks ago and yes, they were red already! Amazing!

Sweet Pimento is just few days from first harvest so no idea about the taste and how thick the flesh is.
Mexican Peppers

Turban Squash
I almost forgot about Turban squash because it is not one of my food crops but Marjo’s pet project that I take care of. It stopped dropping flowers and undeveloped fruits and now I can see decent size squash and a tiny brother/sister. I have noticed that lots of ants were inside some fully opened flowers and that later same flower got sort of choked at stem and then dropped of cleanly like somebody tied a rope around it. Since this was a tobacco field, ants are everywhere in garden! This will be one interesting experiment that Marjo started back in March. We will see when fall comes.

Besides radishes, Daikon and herbs that’s about all I grow this year. Garlic report will be posted next.

Friday, March 4, 2011

Salted Cod with Potatoes, Tomatoes and Olives.


Patate e Baccalà
This is another comfort food. Again, this is not a dish you decide on in the afternoon for that night’s super. Salted cod takes time to soak and remove most of the salt. First day change water every 4 hours or so and next day after 36 hour soak rinse under running water and boil for 20 minutes. Rinse again, then remove all traces of bones and skin. Some bones will be very short. Regardless of how careful I was in removing the bones and then double checking I have always found 1 or 2 on my plate. This is very tasty meal and worth the extra effort.

Ingredients:
1 medium-large onion, thinly sliced
1 large clove garlic, thinly sliced
2 tablespoons extra-virgin olive oil
1 pound salt cod, weighed after it has soaked for 36 hours, and cut into
1/2-inch thick slices
3/4 pound red potatoes, cut into 1/4-inch thick slices
2 canned peeled plum tomatoes, with their interior juices
12 black olives, pitted and halved
1 tsp dried oregano
1/2 cup white wine
1 Tbsp extra-virgin olive oil

Directions:
§    Preheat oven to 350 °F.
§    In a 10-inch Dutch oven or stove-top proof ceramic baker, sauté the onion and the garlic in the olive oil until the onion is golden, about 10 minutes. Remove and reserve about half the onion and garlic mixture.
§    Place layer of salt cod over the onions remaining in the pan, then arrange sliced potato in a ring with potato slices overlapping. Spread around the reserved onion mixture in centre. Cut or crush the tomatoes directly into the pan and spread them in centre. Spread the olives over tomatoes and pour the wine over all, then drizzle with the additional tablespoon of olive oil.
§    Cover and bring to a simmer over medium heat, then place on middle rack in oven and bake for 45 minutes.
§    Let stand, covered, for 10 minutes, during which time the potatoes will become softer, absorbing some of the juices; the juices left in the pan, although reduced in volume, will become a rosy colored sauce. For maximum visual effect, bring the pan to the table undisturbed and serve, hot or warm, directly from the pan.

SERVES 4 TO 6

Loosely based on Sicilian classic.

Monday, January 24, 2011

Cannelloni

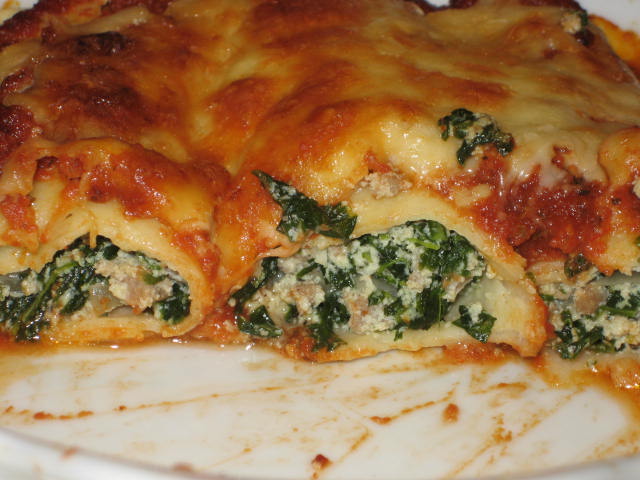
Made with Fresh Egg Pasta
What I have seen personally, Fresh egg pasta cannelloni is an Italian wedding favorite. If everything is done from scratch, like Italian banquette halls usually do, it is job for good part of a day and very labor intensive but worth every step and every minute put into producing this meal.
It is not important if you do pasta or filling first but it is more time saving to make the dough first and while it is resting in a fridge, as it must for at least 30 minutes, you start on filling. As I have previously posted recipe for Fresh Egg Pasta, I will not repeat it here. This post is long enough as it is.
Cannelloni Pasta:
To cook pasta, trim fresh pasta sheet into 4” wide sheets and then cut into 4” squares. Save trimmings in a plastic bag with 1 Tbs flour for soup or pasta and sauce dish.
Bring large pot of salted water to boil. Meanwhile, place large steel bowl with cold water next to pot for cooling down cooked pasta. Have a large tea towel ready.
When water is boiling drop in pasta squares one by one and stir to separate them. Boil for 4 minutes and remove to bowl with cold water with slotted spoon. Immediately straighten the sheets and place them flat on towel. Cook rest of pasta same way. Cover pasta with another wet towel and reserve.


To make the filling that can also be used in Ravioli you will need:
Ingredients for Filling:
3/4 lb. ground veal
1 medium carrots, chopped
1/2 stalk celery, chopped
1/4 cup chopped onion
Frozen spinach (10 ounce package), thawed, excess moisture squeezed out
1 teaspoons salt
1 teaspoons white pepper
2 tablespoons extra-virgin olive oil
1 cup dry white wine
1/4 cup heavy cream
3/4 cup smooth ricotta cheese
1/2 cup grated Parmesan cheese
2 eggs, beaten
2 teaspoons dry Italian herbs
2 tablespoons chopped fresh basil

Preparation:
In a medium hot frying pan add 1 Tbs. of olive oil and sauté onions, carrots and celery until soft and then add spinach. Add salt and pepper and mix well. Remove to large mixing bowl.
In same frying pan add another tablespoon of oil, then the meat and brown lightly. Break apart any clumps that will form. Add wine and cook till all liquid cooks away. Stir frequently.
Remove to bowl with spinach mixture and combine. Add cream, Parmesan cheese, ricotta cheese, beaten eggs and dry herbs and basil. Mix till well combined. You should be able to form a cylinder with the meat mixture.
Fresh Tomato Sauce:
Place 1 can (about 15 ounces) tomatoes and their juice in food processor; process until smooth.
Heat 2 tablespoons virgin olive oil over medium heat in a large skillet. Add 2 cloves minced garlic and 1/2 cup chopped onion; cook until soft. Add the processed tomatoes, 1 teaspoon each salt and pepper, and cook 5 to 10 minutes or until liquid is no longer watery. Add four chopped fresh basil leaves or a little dried leaf basil, and cook 1 minute longer.

Assembly:
Cooked pasta sheets
Meat and Spinach filling
Béchamel sauce
Tomato sauce
Grated Mozzarella cheese


Place enough filling at front edge of pasta sheet to form about 1 ½” diameter cylinder and make a tight roll. When all are done, set aside.
Preheat oven to 350°.
In a bottom of ovenproof serving dish or baking pan pour tomato sauce and then thin layer of Béchamel sauce. Place rolled cannelloni on top and repeat with layers of tomato and Béchamel sauces. Top with grated Mozzarella or Provolone cheese. Bake for 20 minutes or until sauce is bubbly and cheese has melted.

Tuesday, December 14, 2010

Incredible Campari


This tomato was hiding for ten weeks and when found it was in perfect condition!
This morning I had a biggest surprise of my gardening life. OK, so I am gardening only since I retired five years ago, but still.
I was moving a storage cabinet in my basement work shop and out rolled a perfect Campari tomato. Two years ago I collected, fermented and then dried seeds from supermarket tomato because I loved their flavor and size and this was my second season that I have successfully grown them. They are huge producers. (I know that they have registered trademark but I am not selling them.)  
At the end of last September we have collected all tomatoes, including green ones, and stored them in basement. This one must have fallen on the floor and stayed there, on a cold floor, in relative darkness, for ten weeks. TEN weeks! Wow! Next season I’ll try to store them under same conditions: directly on the floor and covered. We’ll see what happens.
By the way, I took concrete floor temperature reading with my infrared thermometer gun and it reads 16°C. The location is close to wall that is insulated only at top four feet. Five feet away the reading was 20°C. It will be interesting to see what happens one year from now and you can be sure that I will harvest seeds from this survivor!
Marjo in my tomato jungle.