Showing posts with label Baked. Show all posts

Sunday, September 4, 2011

Baked Pimento Pepper Halves

Stuffed with Minced Chicken Breast


While rummaging in my freezer I came across vacuum packed chicken breast. Just one chicken breast is not enough to feed 2 people unless I use it in stir fry or with risotto or lots of pasta. None of these options appealed to me, I just had to come up with something that I haven’t done before. Last week I made soup dumplings using minced chicken breast, egg and polenta (!) instead of bread crumbs so I figured I could follow same process. Then I remembered one of our favorite dim-sums: fried and steamed green pepper halves stuffed with ground pork! I have a lot of red pimento peppers in my veggie garden (that I grew from seeds J) so I have decided to use them. They are just perfect size for quick bake, about 2” wide and 4” long. Problem: chicken breast is the leanest meat on the planet and because of that I will have to add some good fat. I figured since everybody (among normal people) loves bacon, why not take couple slices of bacon, chop it and then pulverize it in mini-chopper to add some taste and moisture. New recipe was done, at least in my head.
 Ingredients
1 chicken breast (1 halve), cut into 1” cubes
1 clove garlic
1/2 tsp. salt
2 slices smoked bacon, roughly chopped
1/2 cup toasted bread crumbs
1 egg, beaten
1/4 cup milk
1/2 tsp. ground black pepper
1 tsp. Hungarian paprika
1/4 tsp. dried thyme
1/4 tsp. dried marjoram
1 Tbs. chopped garlic chives or French chives
6 small red peppers
Oil for initial frying

Process
Wash and dry peppers and cut off excess stem.
Split in half lengthwise, remove seeds, white ribs and cut across the stem and as close as possible to pepper wall. You should have only small green knob left.
Place garlic and bacon in a mini-chopper or food processor and process until bacon has a paste consistency.
Scrape the sides of processor bowl and add chicken and pulse until chicken is well minced.
Place bread crumbs, paprika, salt, thyme, marjoram and chives into mixing bowl and mix until well combined.
Mix beaten egg with milk and pour in bread crumb mixture and mix. The crumbs should form small pellets.
Mix the chicken mince with bread crumbs and mix until mixture is well combined and smooth. You should be able to form a ball that holds its shape. Adjust the consistency if needed by adding more milk if dry or more bread crumbs if too runny.
Take a teaspoon of the mixture, make a small pate and fry in little oil to test for seasoning, mainly if it is salty enough since bacon differs a lot in how salty the slices are. Adjust if needed.
With spoon, stuff the peppers with mixture, pressing the meat in all corners and stuffing it a little bit higher than the rim of the pepper. It should have a little mound above the rim.
Preheat oven to 400 °F and place rack in middle.
Heat about 1/2 cup of oil in small frying pan and shallow fry meat side of pepper till golden, about 20 – 30 seconds. Fry only 2 halves at the time, they are very slippery and hard to handle. When seared remove peppers with tongues to plate lined with paper towel. Repeat for rest of peppers.
Place peppers meat side up on a wire or roasting rack and place the rack on baking sheet. (I used my BBQ grill so I’ve omitted the baking sheet and roasted them on warming rack that is higher than cooking grill.)
Bake for 20 minutes.
To Serve
Only you imagination will direct you in how many ways you can serve these stuffed peppers. Simplest one, and the one I used when I served them freshly baked, is just as it is: on a bed of lettuce or arugula with a baguette toast rubbed with garlic and fresh tomatoes. Other suggestion are that you can cut the peppers across into 1 inch slices and put them on top of toasted baguette slices…or serve them in a hot tomato sauce with, you guessed it, garlic rubbed and toasted baguette slices. This was today’s reincarnation of this great meal. Hmmm, it looks like we do like toasted baguette slices rubbed with my very own hard neck garlic. I have to agree, we do. It makes a great base for almost any toppings.

Peppers are ready for initial browning.
Caramelized and ready for baking.

Burners on right and left were on full and two center ones were on low.

  Ready for any way you want to serve them.

Friday, March 4, 2011

Salted Cod with Potatoes, Tomatoes and Olives.


Patate e Baccalà
This is another comfort food. Again, this is not a dish you decide on in the afternoon for that night’s super. Salted cod takes time to soak and remove most of the salt. First day change water every 4 hours or so and next day after 36 hour soak rinse under running water and boil for 20 minutes. Rinse again, then remove all traces of bones and skin. Some bones will be very short. Regardless of how careful I was in removing the bones and then double checking I have always found 1 or 2 on my plate. This is very tasty meal and worth the extra effort.

Ingredients:
1 medium-large onion, thinly sliced
1 large clove garlic, thinly sliced
2 tablespoons extra-virgin olive oil
1 pound salt cod, weighed after it has soaked for 36 hours, and cut into
1/2-inch thick slices
3/4 pound red potatoes, cut into 1/4-inch thick slices
2 canned peeled plum tomatoes, with their interior juices
12 black olives, pitted and halved
1 tsp dried oregano
1/2 cup white wine
1 Tbsp extra-virgin olive oil

Directions:
§    Preheat oven to 350 °F.
§    In a 10-inch Dutch oven or stove-top proof ceramic baker, sauté the onion and the garlic in the olive oil until the onion is golden, about 10 minutes. Remove and reserve about half the onion and garlic mixture.
§    Place layer of salt cod over the onions remaining in the pan, then arrange sliced potato in a ring with potato slices overlapping. Spread around the reserved onion mixture in centre. Cut or crush the tomatoes directly into the pan and spread them in centre. Spread the olives over tomatoes and pour the wine over all, then drizzle with the additional tablespoon of olive oil.
§    Cover and bring to a simmer over medium heat, then place on middle rack in oven and bake for 45 minutes.
§    Let stand, covered, for 10 minutes, during which time the potatoes will become softer, absorbing some of the juices; the juices left in the pan, although reduced in volume, will become a rosy colored sauce. For maximum visual effect, bring the pan to the table undisturbed and serve, hot or warm, directly from the pan.

SERVES 4 TO 6

Loosely based on Sicilian classic.

Sunday, February 20, 2011

Apple Pie

For the last month I was promising my wife that I’ll bake her apple pie. Two weeks ago I bought the apples, unsalted butter and lard so I was ready to bake the pie, I just didn’t get around to it. Then on Saturday I started to prepare my mise-en-place for my thin crust pizza and came across the apples. Immediately I thought that since I will have to use oven why not to bake apple pies before. Well, it was already 2 PM and I had only 3 hours to make them from scratch:
Peel, core and slice apples, prepare and rest the dough, roll the dough, line the pie pans and bake the pies. I was slammed bad! I was in the really tall weeds before I even started! Peeling, coring and slicing the apples wasn’t a problem because I have nifty hand machine that does all three tasks at the same time. The dough is another story. In order for baked pie dough to be light and flaky it has to be worked as little as possible and it has to stay as cold as possible through the whole process. And, it needs a rest, like at least 1/2 an hour in coldest part of fridge. For dough I used fool proof formula of 3-2-1 ratio for flour-fat-water and for fat I used 1 part butter and 1 part pure lard. Since my butter and lard were in freezer all I had to do is carefully cut off amount I needed and grate it directly into the flour, put the mix in my Cuisinart, pulse it couple of times, add ice cold water and pulse it again twice or 3 times. Before I started to work on the dough I put my marble slab outside in the snow. In summer I put it in freezer for few minutes. From food processor dough is placed on a cold slab and kneaded till the dough holds together and you can form a ball. Place in plastic bag flatten and put the bag in coldest part of fridge for at least 1/2 an hour.
Hardest part over, it was time to assemble.
Pie Dough:
3 cups all purpose flour
1 cup unsalted butter
1 cup pure lard
1 cup ice cold water
1/2 tsp. salt
1 Tbs. sugar
Filling:
6 Granny Smith apples
1/2 cup brown sugar
zest from 1 lemon
lemon juice from 1/2 lemon
1 tsp. cinnamon
pinch of ground allspice
1/3 cup potato or corn starch
1/3 cup Sultan raisins
1/3 cup chopped walnuts.
Whisk the flour, salt and sugar together in a large bowl. Using a standard box or potato grater grate the frozen butter into the flour and toss lightly with your fingers until it is thoroughly combined.  Sprinkle in ice water and mix with your fingers until the dough comes together in a ball.  Divide it into two pieces, making sure one half is slightly larger than the other.  Wrap in plastic wrap, flatten and chill for at least 30 minutes or even overnight. Resting will help tenderize the pastry and make it easier to roll.
Remove the pastry from the refrigerator and allow it to warm slightly, just until it is pliable. Lightly flour your hands, the rolling pin, your work surface and the dough. Roll out the larger pastry disc into a circle large enough to slightly overlap the edges of an 8-inch glass pie dish. Transfer the dough to the pie dish by folding it into quarters then unfolding it in the dish.
Preheat your oven to 450°.
Toss the apples with all other filling ingredients. Add the apples to the bottom crust then roll out the remaining smaller disc and carefully place over the top of the pie.  Roll and crimp the edges of the dough together, tightly sealing them.  Poke a few vent holes into the top of the pie and place on the bottom rack of oven.
Baked for 10 minutes in 450 °F oven and then lower temperature to 350 °F and baked for another 45 minutes or until the crust is golden and juices are bubbling.

Saturday, December 4, 2010

Baked Pasta with Ham and Eggs

This is my favorite dish to bring for potluck gatherings and I am sure that once you try it, it will be yours as well. It is delicious, simple, inexpensive and takes less then 90 minutes from prep to plating. Again, you can make it as spicy or mild as you wish. You can even use cooked chicken or turkey.


For 13” X 9” baking pan:
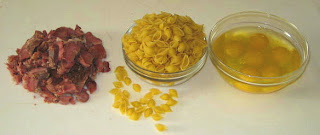
5 c. cooked pasta, (3 c. dry) Conchigliette, small shells or small elbows
2 c. cooked ham or meat from smoked pork hock (my choice!), shredded
6 eggs, lightly beaten
Salt, pepper and paprika to taste

Preheat oven to 400 °F.
Mix all ingredients till well combined, pour into buttered baking pan, shake and tap it on counter top to even the top and place on middle rack of preheated oven.
Start checking after 30 minutes. Bake till golden brown on top.

Let cool and with spatula cut along pan and then carefully lift from bottom. Place on cutting board and cut into serving pieces: small squares/rectangles for potluck or as appetizer and larger pieces for starter or light lunch. It can be served hot or room temperature. If you intend to serve it for a hot lunch, after 30 minutes remove from oven and sprinkle grated cheese of your choice on top, put back in oven and melt till cheese bubbles. Serve with pickles or Cornichons.

Cabbage Rolls


Cabbage Rolls, just like Lasagna, is a favorite for large gathering, be it family, or church or community table. Since in my recipe I’m using Kasha (toasted buckwheat groats) it would qualify as a more traditional Polish version. Again, cook by feel. Every cabbage head is different size so there is no way to say if there will be leftover meat or cabbage.
Savoy Cabbage, 1 head, cored
2lb ground pork or 1lb ground veal and1lb pork
1-1/2 c. cooked Kasha or rice (3/4 dry)
Salt to taste
Ground black pepper
1t. marjoram
2T. Hungarian paprika
2 c. cabbage water (from boiling cabbage)
2 c. tomato sauce

Simmer cored cabbage in lightly salted water and remove leaves as they become soft. (Messy job but somebody has to do it J)

When the leaves cool enough to handle, flatly slice away part of thick main rib on all leaves and lay flat rib up.
Place the outer leaves on bottom of rectangular roasting pan.
Preheat oven to 350 °F.
While cabbage is simmering mix meat, cooked grains, salt and spices till well combined.

Take a tablespoon of mix and shallow fry to check for seasoning. It is always better to start with less salt, you can always add some more.


When happy with taste place meat mixture on end of leaf and roll one turn.

Fold sides over and complete the roll. Place on top of leaf in roasting pan. When all rolls are in pan pour mix of cabbage water and tomato juice on top, spread evenly, cover and bake for 2 hours.


Serve with rice, potatoes or alone.