Friday, November 26, 2010

Veal Ragout with Mushrooms and Noodles

This is one of my favorite dishes since my childhood in Czech Republic and it is a regional specialty. Just like so many ragouts and stews it is better next day after all flavors have combined. This is my slow cooking, no-worry version.

To serve 4
2 Lb. veal shoulder chops, deboned and cut into 1” cubes
3 cups sliced Cremini or Button mushrooms
1 onion, chopped
3 T. butter
2 T. flour
½ cup veal or chicken stock – mushrooms will release lot of liquid
Salt
Pepper
Preheat oven to 220 °C.
Sprinkle the veal with salt and pepper. Melt butter in dutch oven over medium heat and when the foam subsides, add onions and cook until translucent, 6 – 8 minutes. Stir in the veal cubes till meat changes color, sprinkle with caraway seeds and flour and stir to coat meat evenly. Cover tightly and cook over very low heat for 10 minutes, shaking the pan now and then to prevent sticking.
Stir in stock, add mushrooms and stir till well mixed. Bring to simmer and place on middle rack in preheated oven and braise for 2 hours. This allows for the collagen of the connective tissues to melt into gelatin, while keeping the drying up of the muscle fibers at a minimum. After 2 hours raise temperature to 275°C for another hour. After 3 hours in the oven start checking for doneness  (sharp tip of a knife should go in without resistance). At this time you can start boiling water for noodles.
When meat is done, remove from oven and let rest so that meat will reabsorb some of the juices. Boil noodles, drain, toss in butter and keep warm.
Of course, this ragout can be cooked on a stove top at very low heat but it will have to be stirred every 15 – 20 minutes for 3 hours.
All done! Serve with buttered wide noodles. 
Stir in the veal cubes till meat changes color, sprinkle with caraway seeds and flour and stir to coat meat evenly.
Stir in stock, add mushrooms and stir till well mixed.
3 hours plus later...

All done.
 Note: It is very difficult to photograph and plate stew, any stew. It is not a pretty meal regardless of how great it tastes. I did my best with my $150 Canon point-and-shoot camera. Also, for garnish I used parsley from my garden. I am sad to say that they were the last leaves left. I still have plenty of arugula but no parsley.
Arugula in cold frame.

Pear and Orange salad

Besides the tedious task of sectioning the oranges this is a quick and very adaptable salad.
I used:
1 Bosc pear, peeled, cored and cut into wedges
2 oranges, sectioned plus zest
1 sundried tomato
Arugula, handful
Slice of cooked bacon
Goat cheese
Dressing:
1 T. orange juice (drippings from sectioning)
1 T. lemon juice
1 T, maple syrup or honey
2 t. balsamic vinegar
Salt, pinch
Add all dressing ingredients to lidded container and shake till well combined and milky in appearance.
Put arugula on bottom of serving plate/bowl, then alternate orange and pear slices, top with sundried tomato slivers, goat cheese and bacon slice and drizzle dressing on top. For me I would add kalamata olives and sliced jalapeno peppers for some extra kick..

Thursday, November 25, 2010

All Day Breakfast

When my day is very busy and I don’t have a time to cook I usually go for ADB (All Day Breakfast). In our case it means caramelized smoked ham and pineapple, Maple Syrup beans, eggs and toasted English muffin. Great comfort food any time of a day with one drawback: too many frying pans! One for ham and pineapple; one for eggs and a pot for beans. In a restaurant everything is cooked on a hot griddle, it is quick and easy.
I don’t think that I have to write a recipe; picture is worth a 1000 words, right?

Monday, November 22, 2010

Ocean Smelts Tempura

While shopping at Zehrs yesterday morning I passed by fish counter and Ocean Smelts caught my eyes. Suddenly I had craving for Tempura. We never eat fried food but light tempura is exception. Since I wanted super crunchy coating I opted for additional coating in Panko. Here is my version of tempura:

Heat oil in heavy Dutch oven to 350 °C.

Batter:
1 large egg
1 cup beer
¾ cup flour
3 T. corn starch
2 t. baking powder
1 t. sea salt
Hot sauce to taste
Panko bread crumbs

In a bowl beat the egg, add beer, salt and hot sauce and mix.
In bowl mix flour, corn starch and baking powder. Put flour mix into egg & beer mix and mix. Do not over mix, leave some lumps.
Dip cleaned smelts into batter, shake excess batter off and drop into bowl with Panko. Toss till evenly coated, remove to wire rack and repeat till all smelts are ready for fryer. When oil reaches 350 °C drop smelts in and move them around so that they don’t stick to each other. In about 3 – 4 minutes they should be nicely golden and crispy. Remove to rack lined with few layers of paper towel. Place on serving platter and serve with wasabi mayonnaise sauce.

Wasabi Mayonnaise Sauce:
2t. wasabi paste
1/3 cup mayonnaise
Mix wasabi paste and mayonnaise until well combined.

Note:
Every recipe dealing with tempura recommends to make batter in small batches and ice cold. I made my in one large bowl about 1-1/2 hour ahead, coated the smelt and placed in fridge on a wire rack. They came out perfectly crisp and they were not oily at all. I lost only less then 1 teaspoon of oil frying 12 large smelts. Go figure. I guess some old rules can be broken after all.
Second batch waiting for fryer. These smelts were sitting in fridge for 90 minutes, all coated, before hitting the oil.
Light and crispy.

Sunday, November 21, 2010

Garden Walkway


Last year we have decided to plant most of our flowers and some vegetables in containers. To do that one needs some paved area; after all it is not a good idea to place large containers directly on the lawn. Only paved area we had was west facing 8’ x 16’ tiled patio. Well, I was more then happy to design and build a walkway that will go around the house. I build it in several stages over two years and the pavement runs along three sides of the house. East facing front of the house, south facing deck and sunroom, then towards patio and continues north along west side of house and along 3’ x 14’ cold frame. To say that there is a lot of room for containers of all sizes is understatement. According to AutoCAD that I used to design the layout all paved areas cover 820 sq.ft. That’s a lot of grass that I don’t have to water, fertilize and cut. At the same time I designed and build one large island for trees, shrubs, ornamental grasses and flowers. That’s another 1,200 sq.ft. of lawn gone. I just love it!
Here is a short tour.

Acknowledgment:
There were lot of pavers, bricks and flagstones to lift several times each, plus a lot of crushed stone and sand to load and lay down for the base. Since bagged aggregate is very expensive I had to look for other sources. I didn’t have to look very far, just 3 km from our house, and what a lucky find it was! Kirwin – Oatman Excavating had moved to present location at south-west town limit of Tillsonburg from another location in town few years ago. We drove by few times a week on the way to Eden golf course but it never occurred to me that I could buy directly from them. One phone call solved the problem. Since they sell by cubic yard for large projects we had to do some calculating for 2 cubic feet at time; that’s all I could shovel into a recycling bin in my Toyota trunk.
My initial call was picked up by the owner but after that only contact I had with the company was incredibly friendly and efficient secretary Gail. What a pleasure it is to deal with somebody that is so friendly and always smiling. Let’s just say that I paid same price as big volume buyers and that it was just a fraction of what it would cost me retail and also the quality of sand and crushed stone is also much better. They also carry screened topsoil, asphalt/stone mix and other aggregates.
Thanks goes to Gail and Kirwin-Oatman without whom I would be way over budget on this project.
Gail, hard at work.
One of the products they sell is screened top soil. Contracted screening machine at work.

Saturday, November 20, 2010

Pork Tenderloin Roulade with pineapple and grapes.


Today I have challenged myself to come up with new creation based on very first piece of meat that I see in the freezer. As my luck would have it, it was a 5” piece of vacuum packed pork tenderloin. Small piece like that would have to have few things added to it so my plan was to create some sort of roll. Part of the challenge was to use what was in the fridge or pantry only and since I still have parsley, chives and arugula growing in my cold frame it was OK to use.
Here is the result.

Ingredients (to serve 2):
Pork Tenderloin – about 5”
5 slices of smoked and cooked bacon
2 T. melted onions or caramelized onions
3 narrow but thick slices of Havarti cheese
1T. hot Hungarian paprika
2 red potatoes in skin, cut into wedges
2T. sour cream
1T. butter
Arugula, about 10 leaves
Pineapple, 3 rings cut in half
1/3 Cup green seedless grapes
3 T. Grape seed or Canola oil
Step by step procedure:
Preheat oven to 375 °C.
Cut up potatoes and start boiling on medium heat. Once the water starts to boil it will take about 12 minutes to be ready.
Butterfly the tenderloin
and pound it till about 1/8” thick.
Spread onions on pork, sprinkle with hot paprika and cover with bacon slices.
Place cheese about 2” apart so that each layer of the roll will have cheese in irregular pattern.
Roll very tightly and tie with butcher’s twine about every 2”.
Heat frying pan, add oil and brown the roll on all sides. Place in preheated oven and roast for 15 minutes turning once halfway through roasting.
After 15 minutes remove from oven, cover with aluminum foil and let rest.
When you put the tenderloin into oven start caramelizing the pineapple and grapes in 1 T. of butter. In about 5 minutes check for dark brown marks on bottom and turn over both pineapple and grapes.
The judge at table called it a winner and definite repeat.
Saying that, she said that it would be nice to have more of the pineapple, though.

Friday, November 19, 2010

Rice cake and arugula.

This version was prepared using leftover rice and chicken from Arroz con Pollo.
I used same technique as in risotto cake where you make a small ball, flatten it and place small piece of melting cheese like mozzarella in middle and then enclose it around the cheese. Press on all sides and make a little patty, Place in an egg wash (1 large egg, beaten), cover in Panko or bread crumbs and shallow fry in oil on both sides till golden brown and crispy.
Serve it on bed of arugula sprinkled with sea salt with lemon wedge on side and dollop of mayonnaise with lemon zest on top.  
It makes for a great snack.
Note: I know that I should have only one cake on plate for good composition but Marjo was eager to dig in…Next time. J

Wednesday, November 17, 2010

Borsch


Borsch is a soup of Ukrainian origin that is popular in many Eastern and Central European countries. It can be served hot or cold and there are many versions of this soup. My version is a fusion of Ukrainian and Russian Borsch (or Borscht).


• 1 beef shank (or oxtail)
• ¾ cabbage
• Carrots (1 large or a few small carrots)
• Celery (1 stick)
• Tomatoes (1-2 medium size)
• Beets (with no green tops)
• Potatoes (2-3 small)
• Onion
• Garlic
• Bay leaf
• Tomato paste (1 small can)
• Salt
 Sugar
• Sunflower oil
• Baby dill
• Sour cream


BORSCH "DONT'S"  (Adapted from HubPages)

Before I even start with cooking details, I would love to highlight some "don'ts" that may ruin all your efforts with cooking borsch. I know that "7 minute meals" are very popular these days, but this is obviously not the case and these simple notes will help you cook a really good and tasty borsch:
• If there is no time to make stock then trust me, using bouillon cubes is not a way for cooking the borsch. Simply wait until you have time to shop for the necessary ingredients and to cook the actual borsch.
• Buy the freshest meat for borsch, the beef broth is the most important part of this.
• Canned beets can't replace free beets. Period.
• Yes, there is a difference between green or red cabbage. I use green cabbage for cooking borsch.
• Fresh baby dill and garlic are also "must-haves"
• Don't eat your borsch right after you finish cooking it. Cover it with a kitchen towel and leave it for 10-15 minutes.

COOKING STEP-BY-STEP
First step is making the broth. Place your meat in a large pot and bring to the boil, then reduce heat, cover and simmer until the meat is tender (app 2 – 3 hours). This can be done day or two ahead.
A very important thing to do while cooking borsch is to make a "zazharka" (fry up). While the borsch is heating up (if done from scratch) you need to sauté finely chopped carrots, onion and celery in oil.
Take the meat out, discard the bone and put the meat back in the pot along with sautéd carrots, onions and celery.
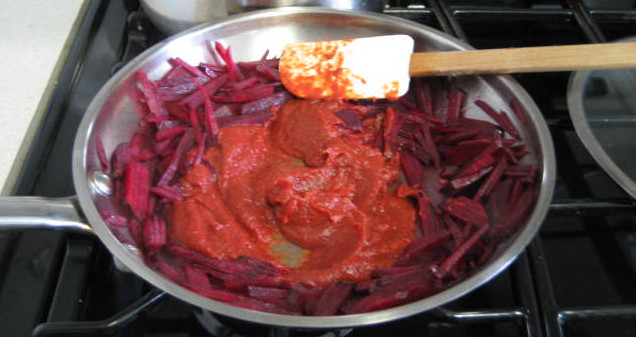
Slice the beets (into strips), add some broth to the pan and place the beets into the pan. Add tomato paste. Cover and let it cook for 5-7 minutes (medium heat).
While the beets are sautéing, cut the cabbage and potatoes and put them in the pot. Bring to the boil.
Sprinkle the beets with vinegar (1 tablespoon) and sugar (1.5 tablespoons)
Add beets to the borsch.
Add salt to the borsch
Remove the meat, chop in small pieces and keep warm. At this time I use immersion blender to chop up some but not all vegetables. Add one bay leaf, cover and leave for at least 15 minutes.

Slice the beets (into strips), add some broth to the pan and place the beets into the pan.

 Add tomato paste. Cover and let it cook for 5-7 minutes (medium heat).


Add beets to the borsch. Sauté finely chopped carrots, onion and celery in oil and transfer to Borsch. Cook for about 30 - 45 minutes. When all the vegetables are soft I use immersion blender to chop up some but not all vegetables. The Borsch should have some bite.


Place chopped beef into preheated bowls and pour Borsch on top. Garnish with sour cream and sprigs of dill and it is ready for the table.