Showing posts with label Cheese. Show all posts

Sunday, December 25, 2011

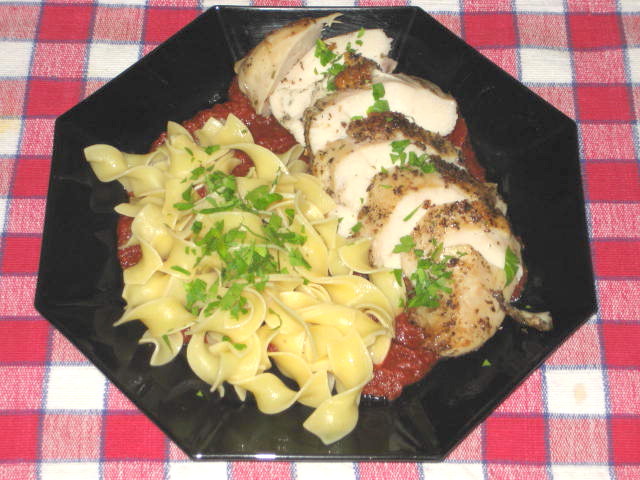
Chicken Breast Roll with Mozzarella and Herbs


This chicken breast roll can be served hot with buttered noodles and tomato sauce or at room temperature thinly sliced and served with crusty bread. Either way it is a great meal for all seasons. I used mozzarella for stuffing but any melting cheese or even blue cheese or combination of both is great. Use of thermometer is almost a must since chicken breast dries very quickly, you don’t want to go over 160 °F. Remember that breast will keep cooking after being removed from oven. As far as seasonings goes, again, it is up to you. Touch of heat is always nice in any meat roll, I usually use chilies pepper flakes and freshly ground white pepper.

Ingredients
2 large boneless and skinless chicken breasts
1 cup grated cheese
1 tsp. Herbes de Provence
1/2 tsp. pepper flakes
Salt and pepper
Olive oil

Directions
Butterfly and pound the chicken breast into 1/4” thick cutlet. (Video that shows the process is attached.)
Preheat oven to 350 °F and place the rack in middle of oven.
Season the cutlet with herbs, salt and pepper and evenly spread the cheese on top stopping about 1” from edges and top. Start rolling away from you making sure that roll is tight. With one full turn left fold over the sides to enclose the roll and finish the roll. Secure the roll by tying loops with butcher twine at 2” intervals. Preheat non-stick frying pan with 2 Tbs. of olive oil on medium high and brown the rolls on all sides. Place the pan in oven and roast until thermometer reaches 155 °F, about 25 minutes. When done, remove from oven and rest for few minutes then cut slice s 1/2” thick. Serve with buttered noodles and tomato sauce.

Tuesday, December 20, 2011

Home Made Mozzarella Cheese


Mozzarella is on of the most common cheeses you see in kitchen. Anybody that has tasted fresh mozzarella will attest that there is absolutely no resemblance in taste and texture to supermarket mozzarella sold in brick form or sliced. Luckily, it is fairly easy to make at home. Give it a try, it might become a regular on “To-do” list. It is on mine. Also, there is one more benefit in making this cheese at home: the leftover whey can be turned into great fresh ricotta cheese.

 Instructions  
Place 4 liters of whole milk into a stainless steel pot.  Measure all of the following ingredients into four individual containers.  This will allow you to make the cheese without worrying about measurements.
2 tsp. citric acid dissolved in 3/4 cup of water
1/4 tsp. Lipase powder dissolved in 2 Tbs. of water
1/8 tsp. rennet dissolved in 1 cup of water
1/2 tsp. flaked salt (optional)
(use only distilled water)


Making the Cheese
Place the pot of milk on the stove over medium heat. It is important that you heat the milk slowly.  Slowly pour in the citric acid and mild lipase powder while you gently stir. Heat slowly until the milk reaches 88 °F.  Stir every few minutes to prevent scorching the milk on the bottom of the pot. You will begin to see the curd develop.
Once the milk reaches 88 °F stir in the rennet and water mixture. Continue stirring every few minutes until the milk reaches 105 °F.
 
Developing the Curd
Remove from the heat and let the milk set, covered, for 20 minutes at 105 °F. Curd will now be fully separated.
Cooking the Curd
Use a slotted spoon or strainer to transfer the curd to a microwave safe dish. If the curd is too soft to transfer, let the milk sit a few more minutes. Pour off as much of the whey as you can. Gently press the curds together with the spoon and force more whey out of them. Squeeze out and drain as much whey as possible.
Place the curd in the microwave on high for one minute. Remove and press the curds again to force out more whey. The cheese should begin to mass together and become sticky. 
After removing as much whey as possible put the bowl back for another 30 seconds.
Add the flaked salt a little at a time and knead the cheese with a spoon as you would bread dough. It will become smooth and shiny. Place the curd back into the microwave and heat on high for one more minute.  Remove from oven and drain any remaining whey.  This time your cheese will be too hot to handle, about 130 °F.

Stretching the Cheese
Knead the cheese again until it sticks to the spoon and pulls away from the bowl.
When the cheese begins to stretch like taffy, it is almost done.  You can have some fun now by pulling and stretching the cheese until it is completely cooled.  This is an important step.  Stretching will make the cheese firm and stringy.  If you prefer a softer texture don't stretch as much.
Place the cheese in an air tight container or wrap in plastic wrap and refrigerate.  Use this cheese within one week or store it in the freezer for up to one month. If your cheese is too soft to shred for pizza, place it in the freezer then shred and use it partly frozen.
Ready for rennet addition.

The curd has formed...

The curd is ready for microwave oven. Notice the green whey that I will turn into ricotta later.

First heating...

Second heating...

First kneading

Cheese is ready to be formed into bocconcini. 

Four liters of 3.25% milk gave me just over 1 pound of mozzarella.

Saturday, September 17, 2011

Home Made Paneer Cheese


Last week Ferdzy, the publisher of Seasonal Ontario Food, posted Beans & Cabbage with Paneer recipe. It brought back memory of my favorite non-melting cheeses. Of course, Halloumi is my favorite, but since it is made with sheep and goat milk there is no chance I can make it myself. Paneer, however, being a cow’s milk cheese is another animal all together (pun intended J). The reason I am saying that is that one of my colleagues (back in my working days) had many lunches that had paneer in it and he said that his wife made fresh cheese on daily basis. Well, if you make cheese every day it does have to be simple, right? And is it ever! It is so simple that you can use just a quart or 1 liter of milk or even less. On top of it, as proven by me on my very first try, it is idiot proof!
When I finished pressing my first curds I have noticed that the whey wasn’t clear and light green as I saw on YouTube. No problem, I said. I put the pot back on burner and when it started to simmer I have added more lemon juice. And what do you know, new curds started to form and whey has turned clear and light green.
Lesson learned: make sure you have more lemon juice than you think you will need.

Here goes a long list of ingredients.
2 L 3.25% milk
1/3 cup fresh lemon juice

Yup, that’s it.

Equipment
Heavy bottom pot
Strainer
Muslin cloth
Spatula
Slotted spoon

Now the hard part. Yeah, right J

Bring the milk to simmer, scrapping bottom of a pot as you go. When the milk starts to roll over slowly pour in about a 1/4 cup of lemon juice. Keep stirring until curds start to form. If the milk doesn’t separate into clear and light green whey, add more lemon juice 1 teaspoon at the time. Juice of one large lemon should be enough to make a clear separation of milk solids and whey but it is always better to be on safe side and have some more juice ready, just in case.
When the whey turns green remove the curds with slotted spoon into a colander or strainer lined with muslin.
Let it drain for about 20 minutes and then tie up the muslin into a ball and put some weight on top to compact the cheese. What I did was that I put the bag with cheese in potato ricer (it does have small holes all around) and placed 1 quart jar on top. Perfect fit!
Let the weight compact the paneer to consistency that you like.
Well, the paneer is done and when eaten still warm and fresh with some strawberry jam, it is a heaven!
Next day I did try to shallow fry some slices with little salt and hot sauce and it was delicious!
Thanks, Ferdzy!

Note: Here are some video links that will help you understand the process.

On this video notice how fast the milky whey turns into a clear greenish whey with just a tee-spoon of lemon juice.

This one is interesting that it shows how to make very smooth paneer. She is using oversized Indian spice grinder but I am sure that mini-chopper will do same thing.

Very innovative and original way to use paneer. It is a definite “Must try soon” for me.

How I made Paneer
 Lemon juice was added and curds started to form.

 Curds started to separate in about 2 minutes.

Curds are placed in fine mesh bag and let drain for 15 minutes...

and then I put the bag in potato ricer (to form nice round cake) and a full jar of honey on top. In under one hour from milk to paneer!!! And, is it ever good still warm and super fresh!

Monday, April 4, 2011

Week of Simple and Tasty Food

Monday
In one of last week’s supermarket flyers one item caught my attention: Real Parmigiano Regiano on sale at less then half price! Wow, got to have that, and lots of it!


Vacuum packed and ready for fridge.


Choice of the supper for that day had to have a Parmigiano in it, of course and since while back I made a big batch of spicy meatballs and tomato sauce and vacuum packed them, the meal was a breeze to prepare.
Wednesday
Russet Potato, Yukon Potato, Sweet Potato and Celeriac.


In the morning I started to crave for mashed potatoes. Not your regular, boring job but mashed root vegetables. I used Gold Yukon and Russet potatoes (baking and mashing potato variety), Sweet Potato and Celeriac. After mashing I added, as I always do, green peas. Served together with caramelized Vidalia onions and juicy pork chops made a really satisfying comfort food to match the lousy weather outside.
 Friday

In the morning it looked like we are going to have a nice grilling weather but as the dinner hour approached it turned cold and windy. The steak I wanted to grill had to be cooked inside. It turned out better then I expected! Tender and juicy and I served the steak on a bed of Napa cabbage and with fresh shitake, steamed asparagus, fresh tomatoes and roasted potatoes. Very, very nice indeed!
Saturday
Nice sunny day outside called for a light meal and since we didn’t have cooked salmon for a while I have decided on a good standby of Salmon Teriyaki with rice and cucumber salad. Foolproof and no fuss meal if you have teriyaki sauce on hand as I always do. We can have this meal every week and in summer we do, I think.


Grilling Season is at the door and I can’t wait. Last week I bought frozen sardines and I want to grill them first chance I get. The whole fish gets grilled with just a salt and pepper, squeezed lemon and fresh Italian bread or baguette with some greens on side and we will have a feast!

We love to eat in our sunroom and to see our garden. Soon, the flower beds will be full of flowers in bloom, starting with tulips and daffodils.

Thursday, December 30, 2010

Crêpes with Seafood and Mornay Sauce

Since I had a leftover of clams and shrimps from last night’s meal (Spaghettini con Vongole) I had to come up with some recipe that will utilize them. As I wrote in my Crêpe post, I came across my crêpe pans and idea for our dinner started to jell. After I made the crêpes all I had to do was make the seafood filling and Mornay sauce. The filling was a cinch; I just added some pink salmon to clams and chopped shrimps and reheated it in their own juices. Then it was on to Mornay sauce which is basically just a Béchamel sauce with cheese. I used Fontina and Gruyere cheese. Also, when I melted the butter for Béchamel I sautéed chopped shallots till soft then added the flour and when light roux was made I poured in the heated milk and chicken stock (no clam juice or fish stock on hand) in 1:1 ratio. When the sauce thickened I whisked in grated cheese until smooth. Salt, white pepper and freshly grated nutmeg seasoned the Mornay sauce.
Then it was to assembly and final prep. Assembly is very simple: put a tablespoon of filling in center front of crêpe, 2 tsp. of sauce on top and roll like taco. Place in buttered baking pan and when all crêpes are placed in pan, cover with aluminum foil and bake in 350°F for 15 – 20 minutes, basically just to reheat it. To serve, pour some sauce on preheated plate, place crêpes on top and then pour more sauce on top. Garnish with shrimps sliced along spine in half, sprinkle chopped parsley and enjoy. It is (was!) so good!
Start Béchamel with butter and shallots.
Add flour and make roux. Finish by adding milk and then cheese. 

Heat clams, pink salmon and shrimps. Now it is on to assembly. 
Place in buttered baking pan and when all crêpes are placed in pan, cover with aluminum foil and bake in 350°F for 15 – 20 minutes, basically just to reheat it.
Notice the arugula garnish on left side of plate. I grew it in my cold frame till first big snowstorm first week of December when it was harvested and stored, unwashed, in Ziploc bag in an unheated garage that had a constant temperature of about 5 °C. Four weeks and it is still as fresh as when it was picked! Incredible green.

Monday, December 13, 2010

Open Sandwiches - Chlebíčky


( Obložené Chlebíčky, Czech)
No matter how you pronounce Obložené Chlebíčky aloud in front of person that was raised in Czech Republic or Slovakia, you will notice instant reaction: they will start to salivate like Pavlov’s dog, the eyes will start to get glassy and breathing will get faster in anticipation of incredible feast. Just like potato salad, which is used on some sandwiches as a base spread, it is an absolute must for Christmas, New Year’s Eve and Easter and at majority of Name Day celebrations. And, just like the potato salad, it is very tedious to prepare due to all the cutting and slicing. That, of course, is on top of making different base spreads for these jewels. Once you have the spreads prepared and gherkins, eggs and pimentos are sliced in traditional cuts, then it is just a question of assembly. Yeah, right, simple assembly...not! These sandwiches are nothing like what you see here in Canada or US. Here, the bread is covered with same flat ingredients end to end. On Czech version, every slice of meat or cheese is shaped into cones, bow ties, rolls...Because of that, every bite has different taste and texture. For example on my hot salami and cheese version in one bite you might have spicy and soft Hungarian salami and crunchy gherkin and other bite will have harder Swiss cheese and slice of pickled egg with mustard. Every family, restaurant and caterer has their own combinations.
Let’s start with spreads. Of course, you could use just a plain butter but why to take shortcuts when you want to prepare something incredible, ne se pas?

#1) Spread for fish based sandwiches (smoked salmon, gravlax, sprats, crab meat...)
1/3 cup cream cheese, room temperature
1/4 cup sour cream (real sour cream, not light imitation)
1/4 cup salted butter, room temperature
1 Tbs. dried dill weed or 1-1/2 Tbs. chopped fresh dill
Place everything in a bowl and mix with fork till smooth.

#2) Spread for meat based sandwiches:
(Ham, salami, pastrami, Montreal smoked meat, etc.)
Same as above but replace dill with 1 Tbs. Dijon mustard.

#3 Spread for almost any combination of toppings:
1 cup potato salad
2 tsp finally chopped parsley
Chop to spread like consistency

Toppings:
Shaved or thinly sliced ham, thinly sliced Hungarian or any hard salami, thinly sliced pastrami and/or Montreal meat, thinly sliced Swiss and Edam cheese, small chunks of Brie, Camembert, Gorgonzola or any blue cheese, gravlax, smoked salmon, sprats, smoked sardines, crab meat, lobster meat, smoked oysters, etc.

Garnish:
Sliced hard boiled or pickled egg, lengthwise sliced gherkins or baby kosher pickles, julienne pimento or roasted red pepper, lemon zest (for fish), parsley, sliced radish or cocktail tomato, chopped capers (salmon),


Here are some popular combinations:
Spread #3, Ham, Swiss cheese, slice of egg with pimento on top, parsley, sliced gherkin.
Spread #2, Hard salami with pickle slice, egg slice on top of soft cheese.
Spread #1, Egg slice, 1 or 2 Sprats, lemon zest, pimento.
Spread #1, Salmon, capers, small piece of lemon, lemon zest.
Spread #3, Swiss cheese, egg slice, pimento, pickle.
Etc, etc, etc….Just use your imagination and use pictures as a guide.


My spread for two people, Christmas 2009. Second plate is just out of picture on top right.
Professional presentation by caterer.

One bite of any of these sandwiches will have you hooked!

Note: For bread I always use baguette sliced about 3/8" thick on diagonal across for more real estate for toppings, but no bigger then what you can eat in two bites. Again, it is a personal choice.