Wednesday, November 17, 2010

Chicken and Rice (Arroz con Pollo - my way)


There are so many versions of Arroz con Pollo in Spanish speaking countries that it is very difficult to pick. So, why not to add to the general confusion by creating my own version. I did just that and here it is.
Ingredients (will serve 2 - 3):
2 chicken legs, cut up
1 T. bacon fat or oil
1 cup Arborio rice
1 cup chicken stock
1 can - 8 oz. crushed tomatoes
1 small onion or 6 shallots
1 stalk celery
1 carrot
1 red pepper
1 green pepper
1 roasted red pepper and
few sprigs of coriander for garnish.
Brown chicken pieces in bacon fat on all sides in a hot preheated Dutch oven, remove to bowl and keep warm. Pour off all accumulated fat except 1 tablespoon. Put all vegetables into pot and sauté for few minutes.
Put chicken pieced back in the pot and add chicken stock and tomatoes and bring to simmer. Cover and simmer for about 40 minutes.
Add rice, stir till combined, cover and lower the heat to slow simmer.
Check for liquid level after 15 minutes. If too dry, add some water or stock.
Keep tasting the rice to make sure it will not be over cooked.
Remove the chicken pieces, debone and keep warm. Place roasted red peppers in pot to heat through.
Serve the rice on plate with red peppers on top, then deboned chicken and garnish with coriander (cilantro).
Note: This is stovetop version but can be done in 350 °C oven. Also, you can use long grain rice but you will have to adjust the amount of liquid by about 25%.

Monday, November 15, 2010

Shakshuka (Eggs Poached in Tomato Sauce)


I can imagine how many people would be uneasy to try this recipe because of the name. It is simple dish loved by Israelis and with Lebanese origin. So simple yet so delicious. I have prepared it tonight and according to Marjo it will be on menu at least every other week if not more often. Again, thanks go to Saveur online newsletter.

Eggs Poached in Tomato Sauce
1/4 cup extra-virgin olive oil
5 Anaheim chilies or 3 jalapeños, stemmed, seeded, and finely chopped
1 small yellow onion, chopped
8 cloves garlic, crushed
1 tsp. ground cumin
1 tbsp. paprika
1- 28-oz. can whole peeled tomatoes, not drained 
Kosher salt, to taste
8 eggs
1/2 cup crumbled feta cheese
1 tbsp. chopped flat-leaf parsley
Warm pita, for serving


1. Heat oil in a 12" skillet over medium-high heat. Add chilies and onions and cook until soft and golden brown, about 6 minutes. Add garlic, cumin, and paprika, and cook, stirring frequently, until garlic is soft, about 2 more minutes.
2. Put tomatoes and their liquid into a medium bowl and crush with your hands. Add crushed tomatoes and their liquid to skillet along with 1/2 cup water, reduce heat to medium, and simmer, stirring occasionally, until thickened slightly, about 20 minutes. Season sauce with salt.
3. Crack eggs over sauce so that eggs are evenly distributed across sauce's surface. Cover skillet and cook until yolks are just set, about 5 minutes. Using a spoon, baste the whites of the eggs with tomato mixture, being careful not to disturb the yolk. Sprinkle Shakshuka with feta and parsley and serve with pita, for dipping.

SERVES 4 – 6

Note:
I didn’t use Jalapeno or hot peppers because my wife, as most other people, doesn’t tolerate the same heat level as I do. I used sweet banana red/green peppers instead and used hot Hungarian paprika to spice it up to acceptable level.

Main ingredients.
Seasoning.

Saute onions and peppers.
Add cumin, paprika and garlic, cook till fragrant.

Add tomatoes and simmer (I transferred sauce to earthenware pot).


Add eggs and feta and poach till whites are set.


Ready to be served.

It is so, so good. I can't wait to prepare it again.


Pita Bread


Pita bread is so versatile. I have searched all over for a simple recipe adapted to western kitchen and this one fills the bill. You still have to experiment a bit to be consistent. This version is adapted from The Bread Bible.

2 cups plus a scant 1/4 cup unbleached all-purpose flour
1 teaspoons salt
1 teaspoons instant yeast
1 tablespoons olive oil
3/4 cups water, at room temperature

1. About 1 1/2 hours before shaping, or for best flavor development, 8 hours to 3 days ahead, mix the dough. Put all dry ingredients into food processor and pulse until combined. Turn on and pour all water at once. Process till sides of bowl are clear.
2. Let the dough rise: Using an oiled spatula or dough scraper, scrape the dough into a 2-quart or larger dough-rising container or bowl, lightly greased with cooking spray or oil. Press the dough down and lightly spray or oil the top of it. Cover the container with a lid or plastic wrap. With a piece of tape, mark the side of the container at approximately where double the height of the dough would be. Refrigerate the dough overnight (or up to 3 days), checking every hour for the first 4 hours and pressing it down if it starts to rise.
3. Preheat the oven: Preheat the oven to 475°F one hour before baking. Have an oven shelf at the lowest level and place a baking stone, cast-iron skillet, or baking sheet on it before preheating.
4. Shape the dough: Cut the dough into 4 or 6 pieces. Work with one piece at a time, keeping the rest covered with a damp cloth. On a lightly floured counter, with lightly floured hands, shape each piece into a ball and then flatten it into a disk. Cover the dough with oiled plastic and allow it to rest for 20 minutes at room temperature.
Roll each disk into a circle a little under 1/4 inch thick. Allow them to rest, uncovered, for 10 minutes before baking.
5. Bake the pita: Spritz each rolled-out pita with water two or three minutes before baking it. Quickly place 1 piece of dough directly on the stone or in the skillet or on the baking sheet, and bake for 3 minutes. The pita should be completely puffed but not beginning to brown. The dough will not puff well if it is not moist enough. See how the pita puffs, then, if necessary, spray and knead each remaining piece with water until the dough is soft and moist; allow to rest again and reroll as before.
Proceed with the remaining dough, baking 3 or 4 pieces at a time if using a stone or baking sheet. Using a pancake turner, transfer the pita breads to a clean towel, to stay soft and warm. Allow the oven to reheat for 5 minutes between batches. The pitas can be reheated for about 30 seconds in a hot oven before serving.
To cook the pitas on the stove top: Preheat a griddle or cast-iron skillet over medium-high heat. Lightly grease the surface and cook the pitas one at a time. Cook for about 20 seconds, then turn the dough and continue cooking for 1 minute or until big bubbles appear. Turn the dough again and cook until the dough balloons. If the dough begins to brown, lower the heat. The entire cooking process for each pita should be about 3 minutes.


After 2nd rise.


Rolled and ready for the oven or cast iron frying pan.

Wednesday, November 10, 2010

Melted Onions

4 large Vidalia or white onions, thinly sliced
¼ cup olive oil
1t. sea salt

Heat oil in a saucepan then add onions and salt and sauté uncovered till soft, about 15 minutes. Cover with circle cut out of parchment paper to fit pan (cartouche), lower the heat to low and cook for about 4 to 5 hours. The onions will have consistency of a jam or spread.
You start with what looks like a lot of onions.
Cover with cartouche, turn heat to low and stir every 1/2 hour.

And, that's it!

The Saveur says that onions will be reduced by half. To me it looks like being reduced by 80%, at least. But, well worth it for sure. The taste is so sweet and deep. I can imagine what an incredible soup this would make. Looks like a next project.

Potato Pizza


As a subscriber to Saveur Magazine newsletter I receive several recipes each week. Last week I was intrigued by Potato Pizza so last night I have decided to give it a try. What an incredible meal it was! Only drawback, if you can call it that, is that Melted Onions that replace traditional sauce took well over 4 and half hours to make. Yup, four and half hours!
 
Melted onions go first on pre-baked thin crust pizza.
 
Potato slices is the main topping.
Then oregano, Fontina and Grana Padano cheese.
Great pizza! Thanks, Saveur!

Recipe for Melted onions follows.

Saturday, November 6, 2010

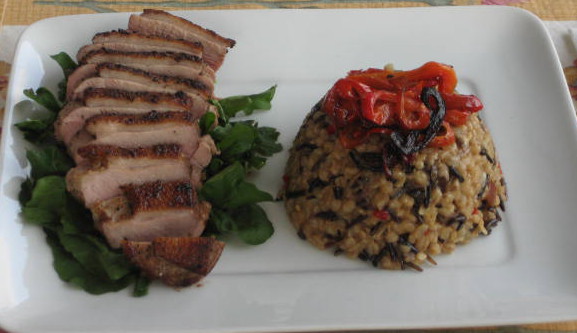
Pan Seared and Roasted Duck Breast

We just love duck or duck parts prepared in any way. I must have cooked well over 200 ducks and/or parts and I have learned one thing: to roast whole bird in one piece is terrible waste. While breast needs only about 15 - 20 minutes in a heavy skillet on stove top and 400°C oven, the legs on other hand need 2 hours in 350°C oven. When you do whole bird, by the time legs are done the breast is way too overcooked, dry piece of meat regardless of how much fat you leave on the bird. And there is a lot of fat. I cut up the duck into 2 breasts, 2 legs and cage and wings (video). When I roast the legs I roast the cage and wings at the same time for my duck stock. The roasted bones make incredible stock when slowly simmered with root vegetables for 2 – 3 hours.
On this occasion I served the breast with my very own Three Grains Risotto.

Pan Seared Duck Breast
 One breast will serve 2 people.
1.      Preheat  oven to 400°F
2.      Very generously season breast on both sides with sea salt and cracked black pepper
3.      Do not score the skin, there are enough pores in the skin to release the fat and it also makes much better slices when done.
4.      Place the duck breast skin-side down on a cold dry pan and turn on the heat (medium).
5.      As the fat renders out of skin pour it out.
6.      Once the skin is crispy and golden, turn the duck breast over and continue cooking for 1 minute, just to sear the meat
7.      Turn the duck breast skin-side down on the pan and place it into the oven and cook for 6 minutes. Test if done. Medium rare is at 125°F at thickest part of breast.   
8.      Remove from oven and let the duck breast rest for about 10 - 15 minutes.
9.      Slice at an angle, dot the slices with aged Balsamic Vinegar and serve on a bed of arugula.
Note: The cold dry (meaning no oil) pan is important; starting on a pre-heated pan sears and locks up the fat and you end up with an overly-fatty piece of meat.

Three Grains Risotto

This version is prepared same way as regular risotto but is much more tolerant of how often you steer it and you can keep it warm unlike Arborio risotto that has to be served immediately. Also, it is a good side dish for turkey or any wild game meat.
You will need:
2 t. olive oil
1T. butter
3 shallots or ½ small white onion, finally chopped
2 cloves of garlic, finally chopped
½ cup wild rice, washed
½ cup barley, washed and rinsed
½ cup Basmati rice, washed
½ cup white wine
4 – 5 cups chicken stock
Heat the stock.
In a separate pan heat the olive oil and butter, add the onions and garlic and stir fry very slowly for about 15 minutes without coloring.
After the vegetables have softened, add all the grains and turn up the heat.
When the grains start to look slightly translucent pour in the wine and let the grains absorb almost all the wine.
Add 2 cups of hot stock and stir for few seconds. Cover and simmer on low heat for about 15 minutes.
Check and stir every 5 minutes or so.
When stock is absorbed add another cup.
Taste for seasoning and add salt if needed.
Repeat till all the grains are cooked to your taste.
Stir in 1 T. of butter, set aside and keep warm.

Enjoy...

Friday, November 5, 2010

Teriyaki Salmon


Salmon can be as complicated as Coulibiac with over dozen ingredients and 6 or more different cooking / baking preparations or as simple as sashimi with 2 or 3 ingredients. My favorite is close to the bottom of prep time required. Just salmon fillet, steamed rice, asparagus, teriyaki and wasabi-mayo sauce.
I start the rice first in rice cooker and while rice is steaming I prepare the wasabi sauce by mixing wasabi powder with water to smooth paste consistency and then mix in about 1 portion of wasabi paste to 3 parts of mayonnaise and blend well. Keep at room temperature.
Sprinkle salmon with sea salt on both sides. Heat up frying pan and when hot add peanut or grape oil (veggie oil will do as well). Put salmon fillet skin side down in a pan for about 2 minutes. Flip over and cook for another 3– 4 minutes. We like our salmon closer to rare or medium rare where it just starts to flake, it will keep cooking when out of frying pan.
While salmon is cooking I cook asparagus with a dab of butter and few drops of sesame oil in microwave, uncovered, for 1 minute to retain some crunch.
When salmon is done remove it to heated serving plate. Pour teriyaki sauce into the frying pan to heat through. Pour teriyaki sauce over salmon and then top it with wasabi sauce. Put rice on plate and sprinkle with crumbled seaweed and toasted sesame seeds next to asparagus and salmon. This is truly 30 minutes meal only because rice takes that long to cook.

Cauliflower and broccoli soup

Cauliflower and broccoli soup is one of the most delicious comfort soups. Even though it is a bit tedious to make since there is a lot of vegetable peeling and chopping involved it is definitely worth the 45 minutes of prep time. Next time I’ll give my Cuisinart some workout, I think.
It is pretty well mix and match of what vegetables besides cauliflower, broccoli and onions you have available and what you like.
Potato, sweet potato, parsnip, leeks, asparagus and even turnip are some of other vegetables that I could have used.

In my last reincarnation of this soup I had about:

½ a head of cauliflower
½ head of broccoli
½ white onion
6 shallots
1 zucchini
2 stalks of celery
1 carrot
½ a head of medium celeriac
4 cloves of garlic


All finely sliced or chopped and totaling about 8 cups.

Heat 6 cups of chicken or beef stock in a pot.
Melt 1 T butter and 1 T olive oil in heavy bottom Dutch oven and add shallots and onions and sauté till translucent and then add rest of vegetables and sweat them for about 10 minutes. Add 1t (or to taste) of curry and mix well.
Add hot stock, cover and slowly simmer for about an hour. Using submersible blender puree to consistency that will leave some vegetable chunks intact. Taste for salt and add 35% cream, again, to taste and bring back to simmer. Remove from stove and serve with some toasted baguette slices rubbed with garlic.